Install these tools on your website to promote your events, build your Bandsintown following and grow your fan email and SMS list:
Before Starting: Identify your Shopify Theme Architecture
Events Widget: event listing with fully customizable text, look and feel to match your style
Follow Button: a simple call to action to grow your Bandsintown following while building your contact list
Signup Form: an email signup form to build your contact list while growing your Bandsintown following
IDENTIFY Before PASTing YOUR WIDGET CODE ON Shopify
Theme architecture versions
In July 2021, Shopify released a new theme architecture called Online Store 2.0
Themes that use the previous architecture are called vintage themes.
We built our demos using the following Themes:
Shopify Theme Store will allow you to browse free and selected paid themes using search and filter tools.
1. CUSTOMIZE
Use our builder to customize your widget
2. COPY
Copy your embed code.
or
STEP 1: CREATE YOUR CUSTOM WIDGET
Get set up easily in just a few clicks—no coding required. Use the default install settings to have the widget automatically match your website's color scheme, or dig deeper to customize fonts, colors, content, and more.
Please note that the Events Widget is compatible with all website builders that support HTML editing. This includes WordPress, Wix, Squarespace, Shopify and more.

STEP 2: Copy your WIDGET CODE
Once you’ve finished customizing your widget, click on the button ‘Copy Code’.

Need Help? Start a chat we'll be happy to assist you.
STEP 3. Paste YOUR WIDGET CODE ON A Shopify VINTAGE
THEME
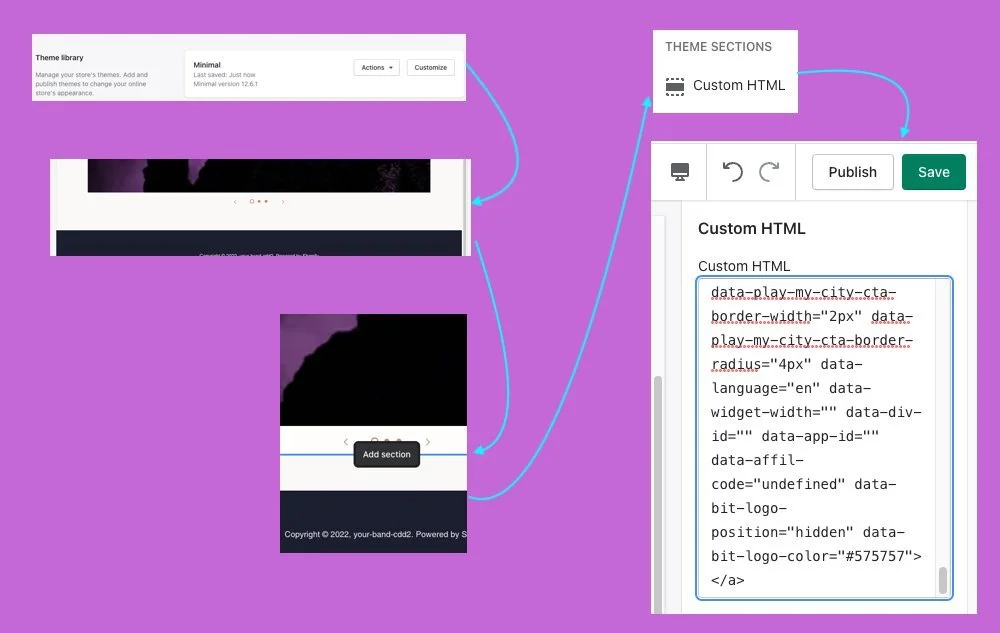
In your Shopify account, go to your Web Site Theme then click Customize
Select the page where you want to display your tour dates (or create a new one)
Click on the + button to Add a Section
Select Custom HTML
Paste your Bandsintown widget code in the Custom HTML Section
Click on Save to save your changes
Your shows are now listed on your website and will sync in real-time with your Bandsintown account
STEP 4. Paste YOUR WIDGET CODE ON Shopify Online Store 2.0
STEP 4.1 Before Pasting the Widget Code
The challenge: (OS 2.0 does not offer the section Custom HTML)
In order to install the BIT Widget, it is necessary to install the JS code in a Custom HTML Block, so it was not evident how to do it in this new Theme.
The solution to simulate a Custom HTML Section
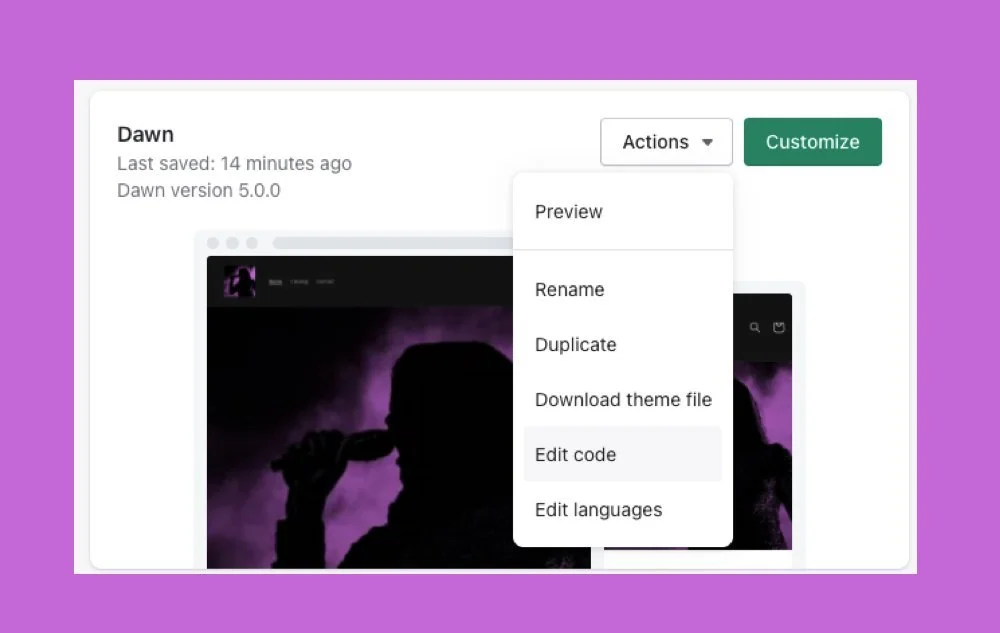
1. Go to Edit Code on your Theme
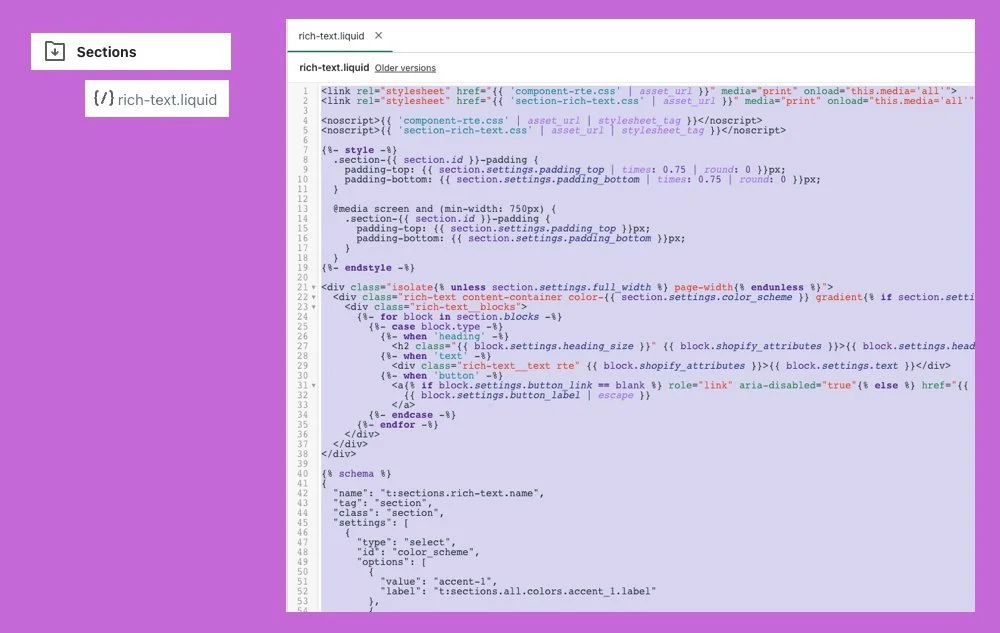
2. Go to Sections and Open the Section called “rich-text.liquid”, then copy the entire text.
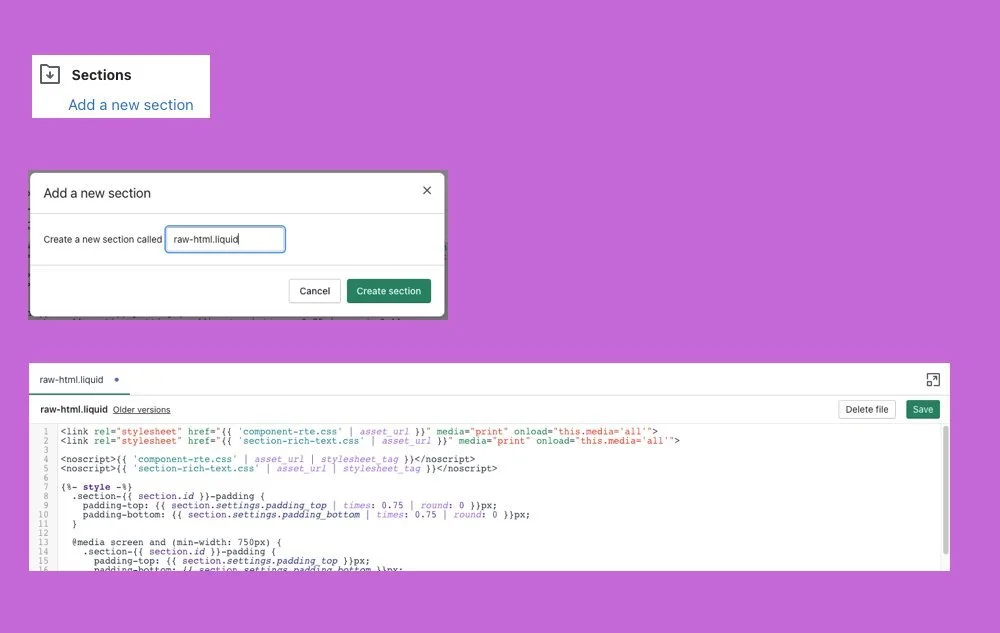
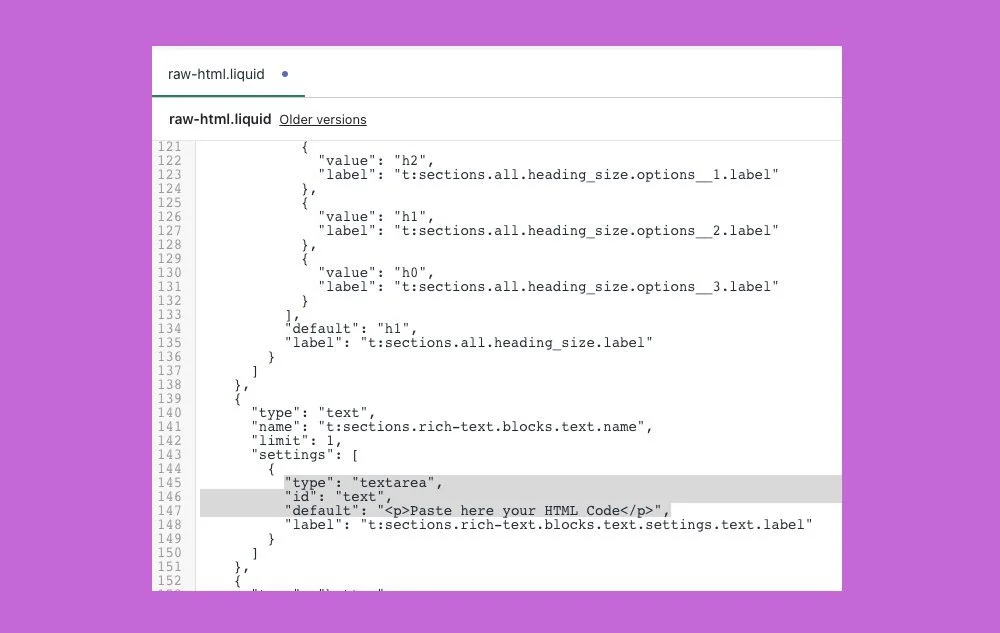
3. Got to Add a new section, call the new section : “raw-html.liquid”, then paste the code you copied on steep 2.
4. In the new file search for the line “type": "richtext" and change it for "type": "textarea"
STEP 4.2 PASTing YOUR WIDGET CODE ON Shopify Online Store 2.0
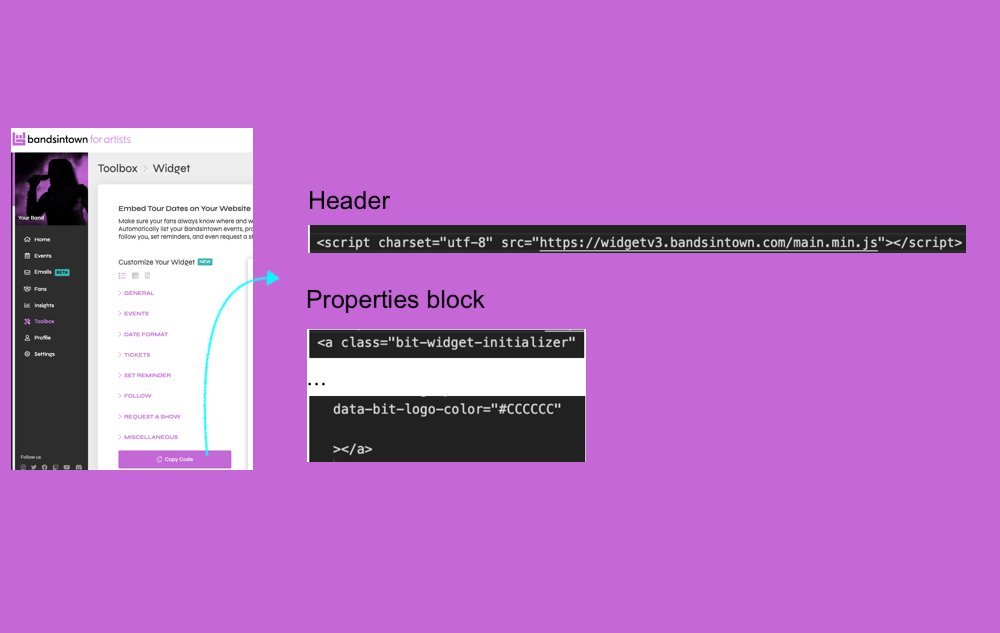
Copy your widget code from your Bandsintown for Artists (Manager Page)
Your widget code is divided in two sections: The Header and the Properties Block
2. In your Shopify Theme, go to Edit Code and search for the section header.liquid
3. Open the section and paste your Widget Header like the example below

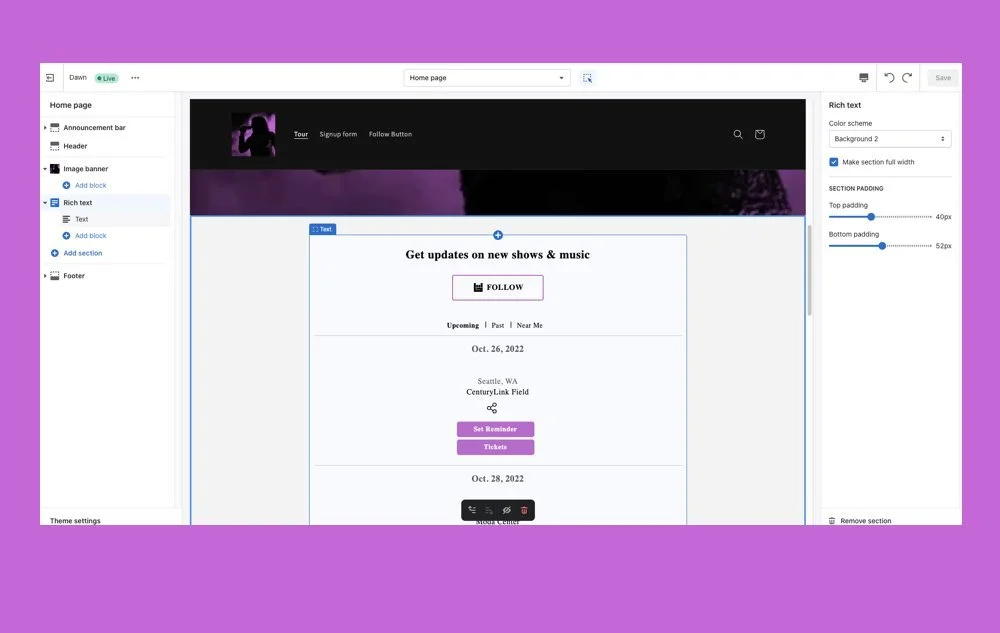
4. Go to Customize your theme
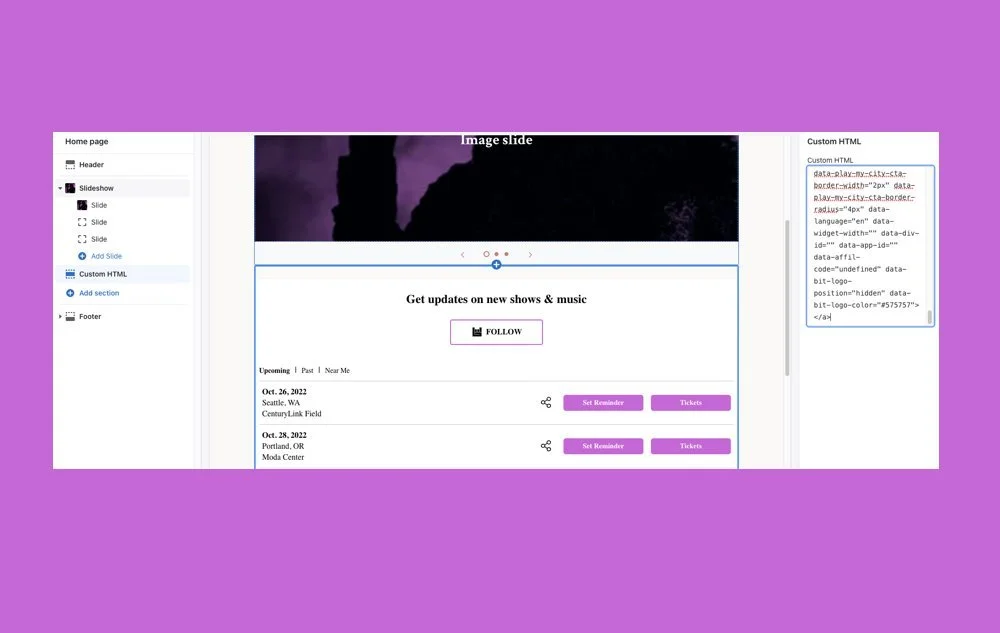
5. Select the page where you want to show your widget and add a new section
You will see two sections with the same name “Rich Text“
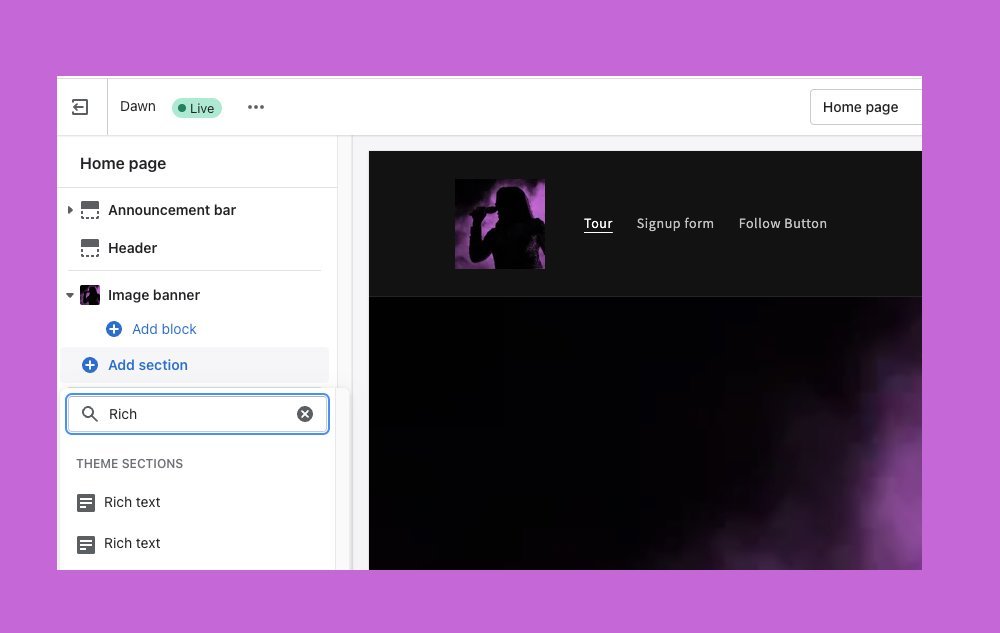
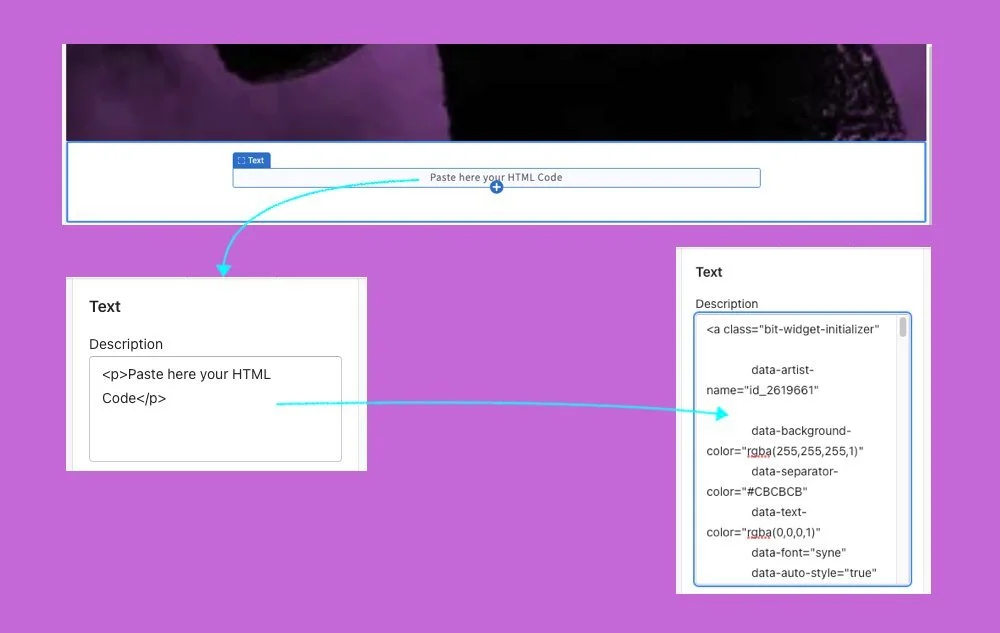
6. Make sure you select the Section where you can add HTML code in a textarea.
Remove the Heading and the Button, so at the end you will see only the Block “Paste Here Your HTML Code“

7. Click on your Text Area, then on description and finally paste your Properties Block
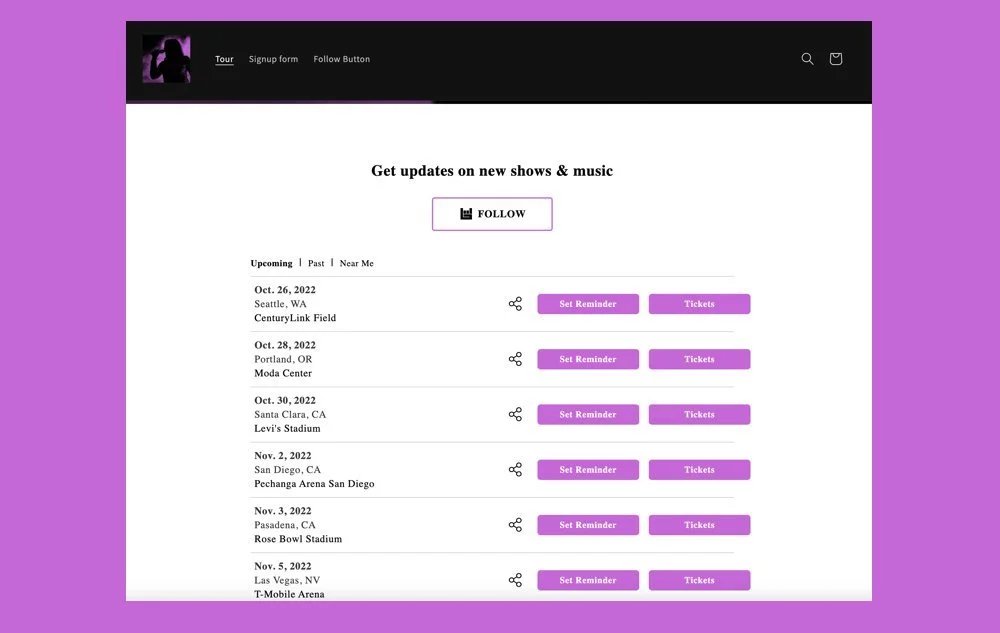
8. Your Widget will show on your Shopify page
STEP 4.3 After PASTing YOUR WIDGET CODE ON Shopify Online Store 2.0
Depending on your theme, it's possible that events may not be aligned or you may find the widget too narrow. Here's what you can do then:

The widget could be affected by the CSS properties of the website where the widget is installed.
In this case, the section “raw-html.liquid” that we have created is affected by a CSS asset “section-rich-text.css”

1. Go to Edit code and Search for the Asset “section-rich-text.css”, then copy the code of this css and create a new asset called “section-raw-html.css”, then paste the code.
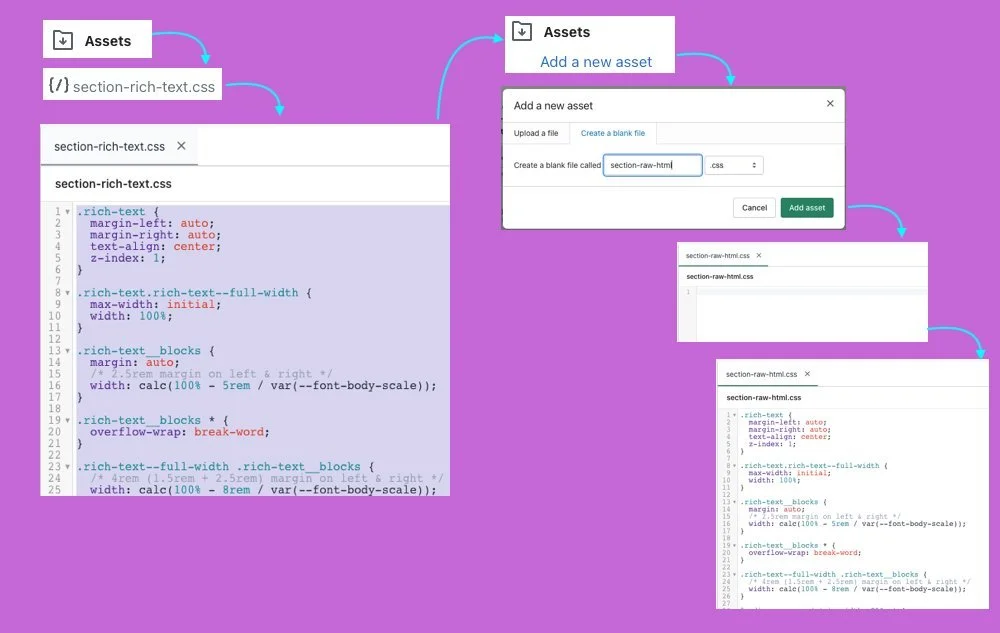
2. Open the section “raw-html.liquid” and replace the reference to “section-rich-text.css” for “section-raw-html.css” like the image below

3. Open the code of your asset “section-raw-html.css” and change the following lines:

The Widget will be adjusted
01. Build your URL
Define the URL you will use in your Follow Button
02. Paste your URL
Paste your URL on your Squarespace Button
03. Test your Button
Verify the button will open the fan acquisition form
STEP 1: Build the URL to use on your Follow Button
You could follow this template to create your URL
https://bandsintown.com/artist-subscribe/2619661?app_id={your_app_id}&affil_code={your_affiliation_code}&came_from=267&utm_source=public_api&utm_medium=api&utm_campaign=trackCopy the URL above and make sure to:
replace 2619661 by your own Bandsintown artist ID
replace {your_appid} with a custom string composed of the prefix shopify- followed by the artist name. For example shopify-your-artist
replace {your_affiliation_code} with the Affiliation Code you already use to call the Bandsintown API (or remove the affil_code parameter altogether if you don’t already have one)
Other Parameters you could add to the URL to customize colors, sizes and fonts:
&bg-color=%231A1A1A&border-color=%23FFFFFF&cta-bg-color=%23FFFFFF&cta-border-color=%23FFFFFF&cta-border-radius=0px&cta-border-width=3px&cta-text-color=%23FFFFFF&font=Helvetica%20Neue&text-color=%23FFFFFF
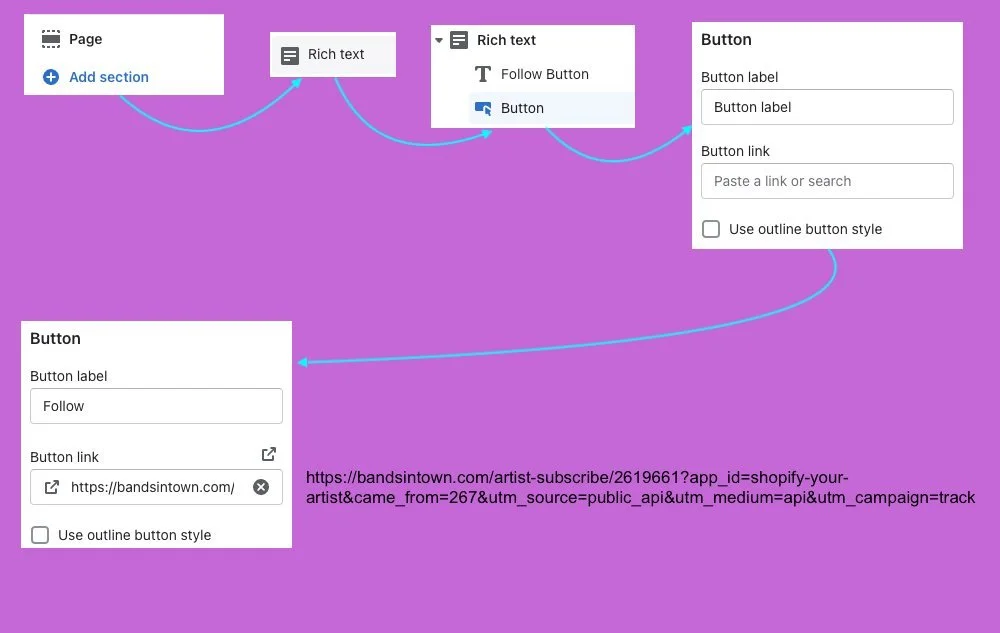
STEP 2: Paste your URL on your Shopify Button
Once you’ve finished customizing your URL, create your Shopify Button and paste the URL
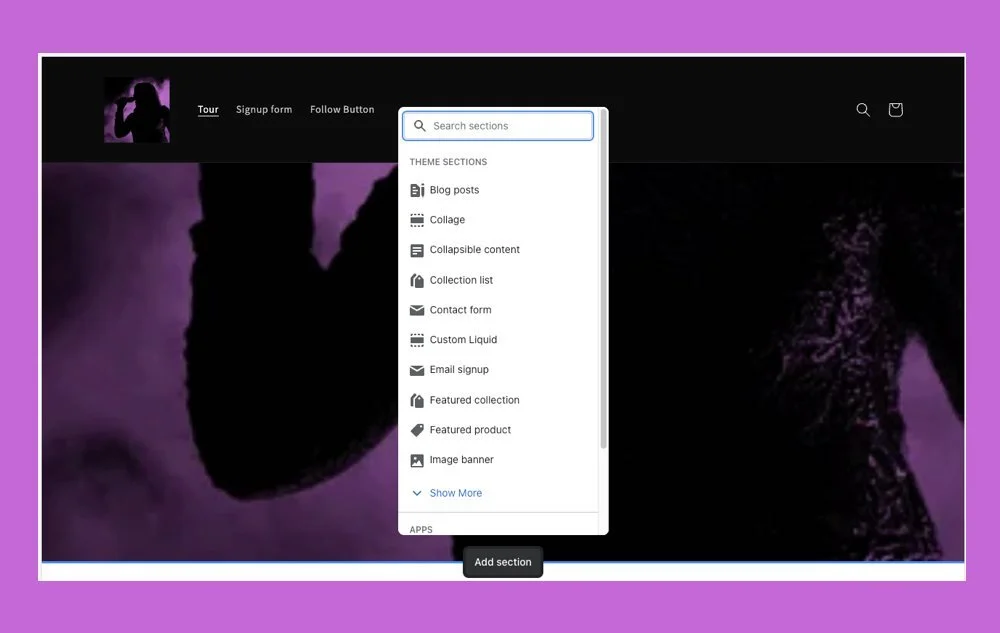
Click on Add Section
Select Rich Text
Sect your block “Button“
Paste the URL code you created on step 1, inside the Button Link field
Click on Save to publish the changes
Check if the Buttons is linking to your URL
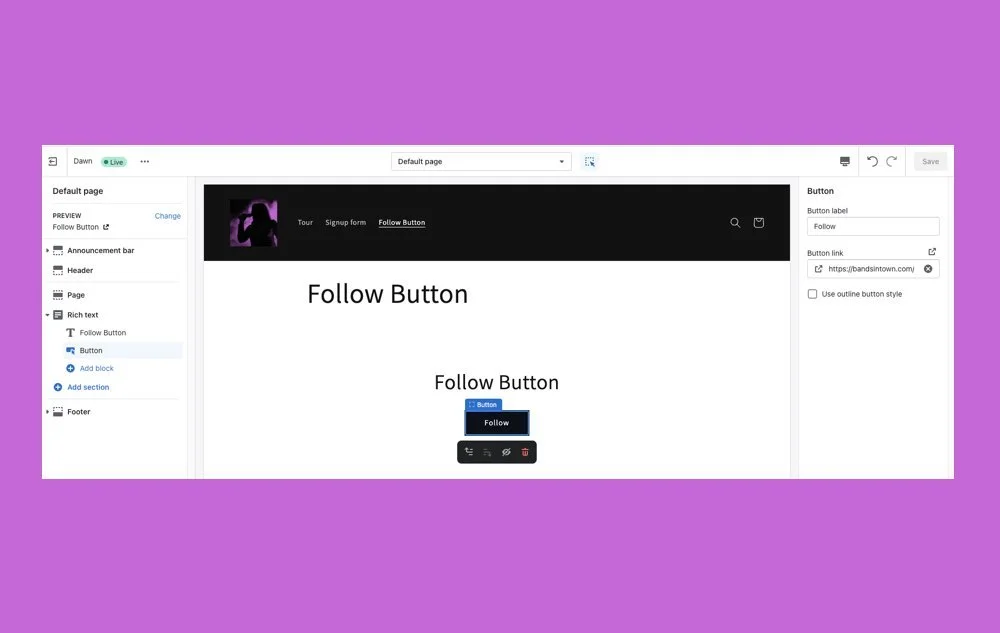
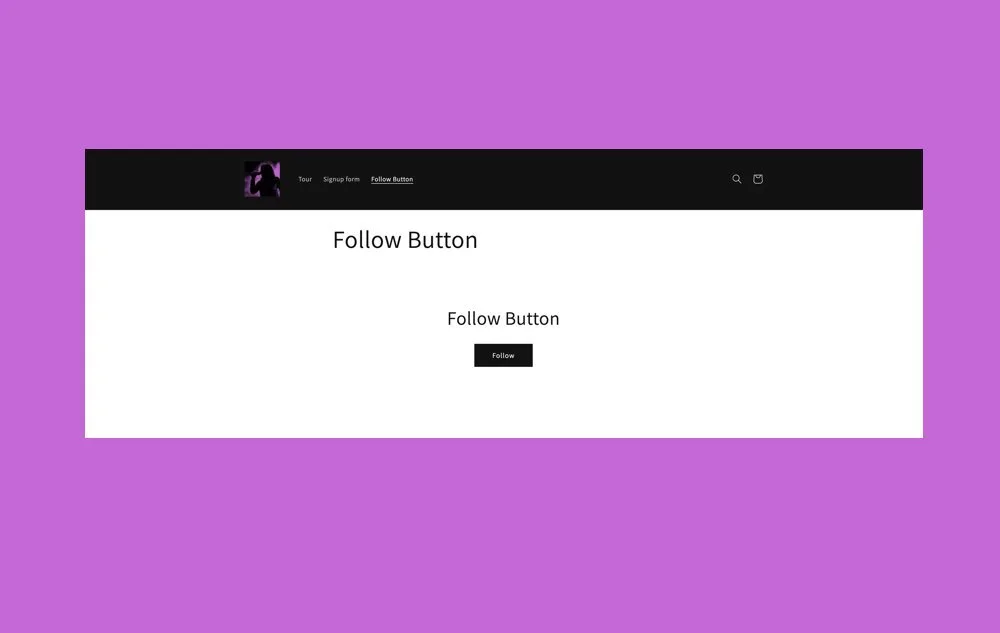
STEP 3: Test your Button
If you click your button you should see the Fan Acquisition Form

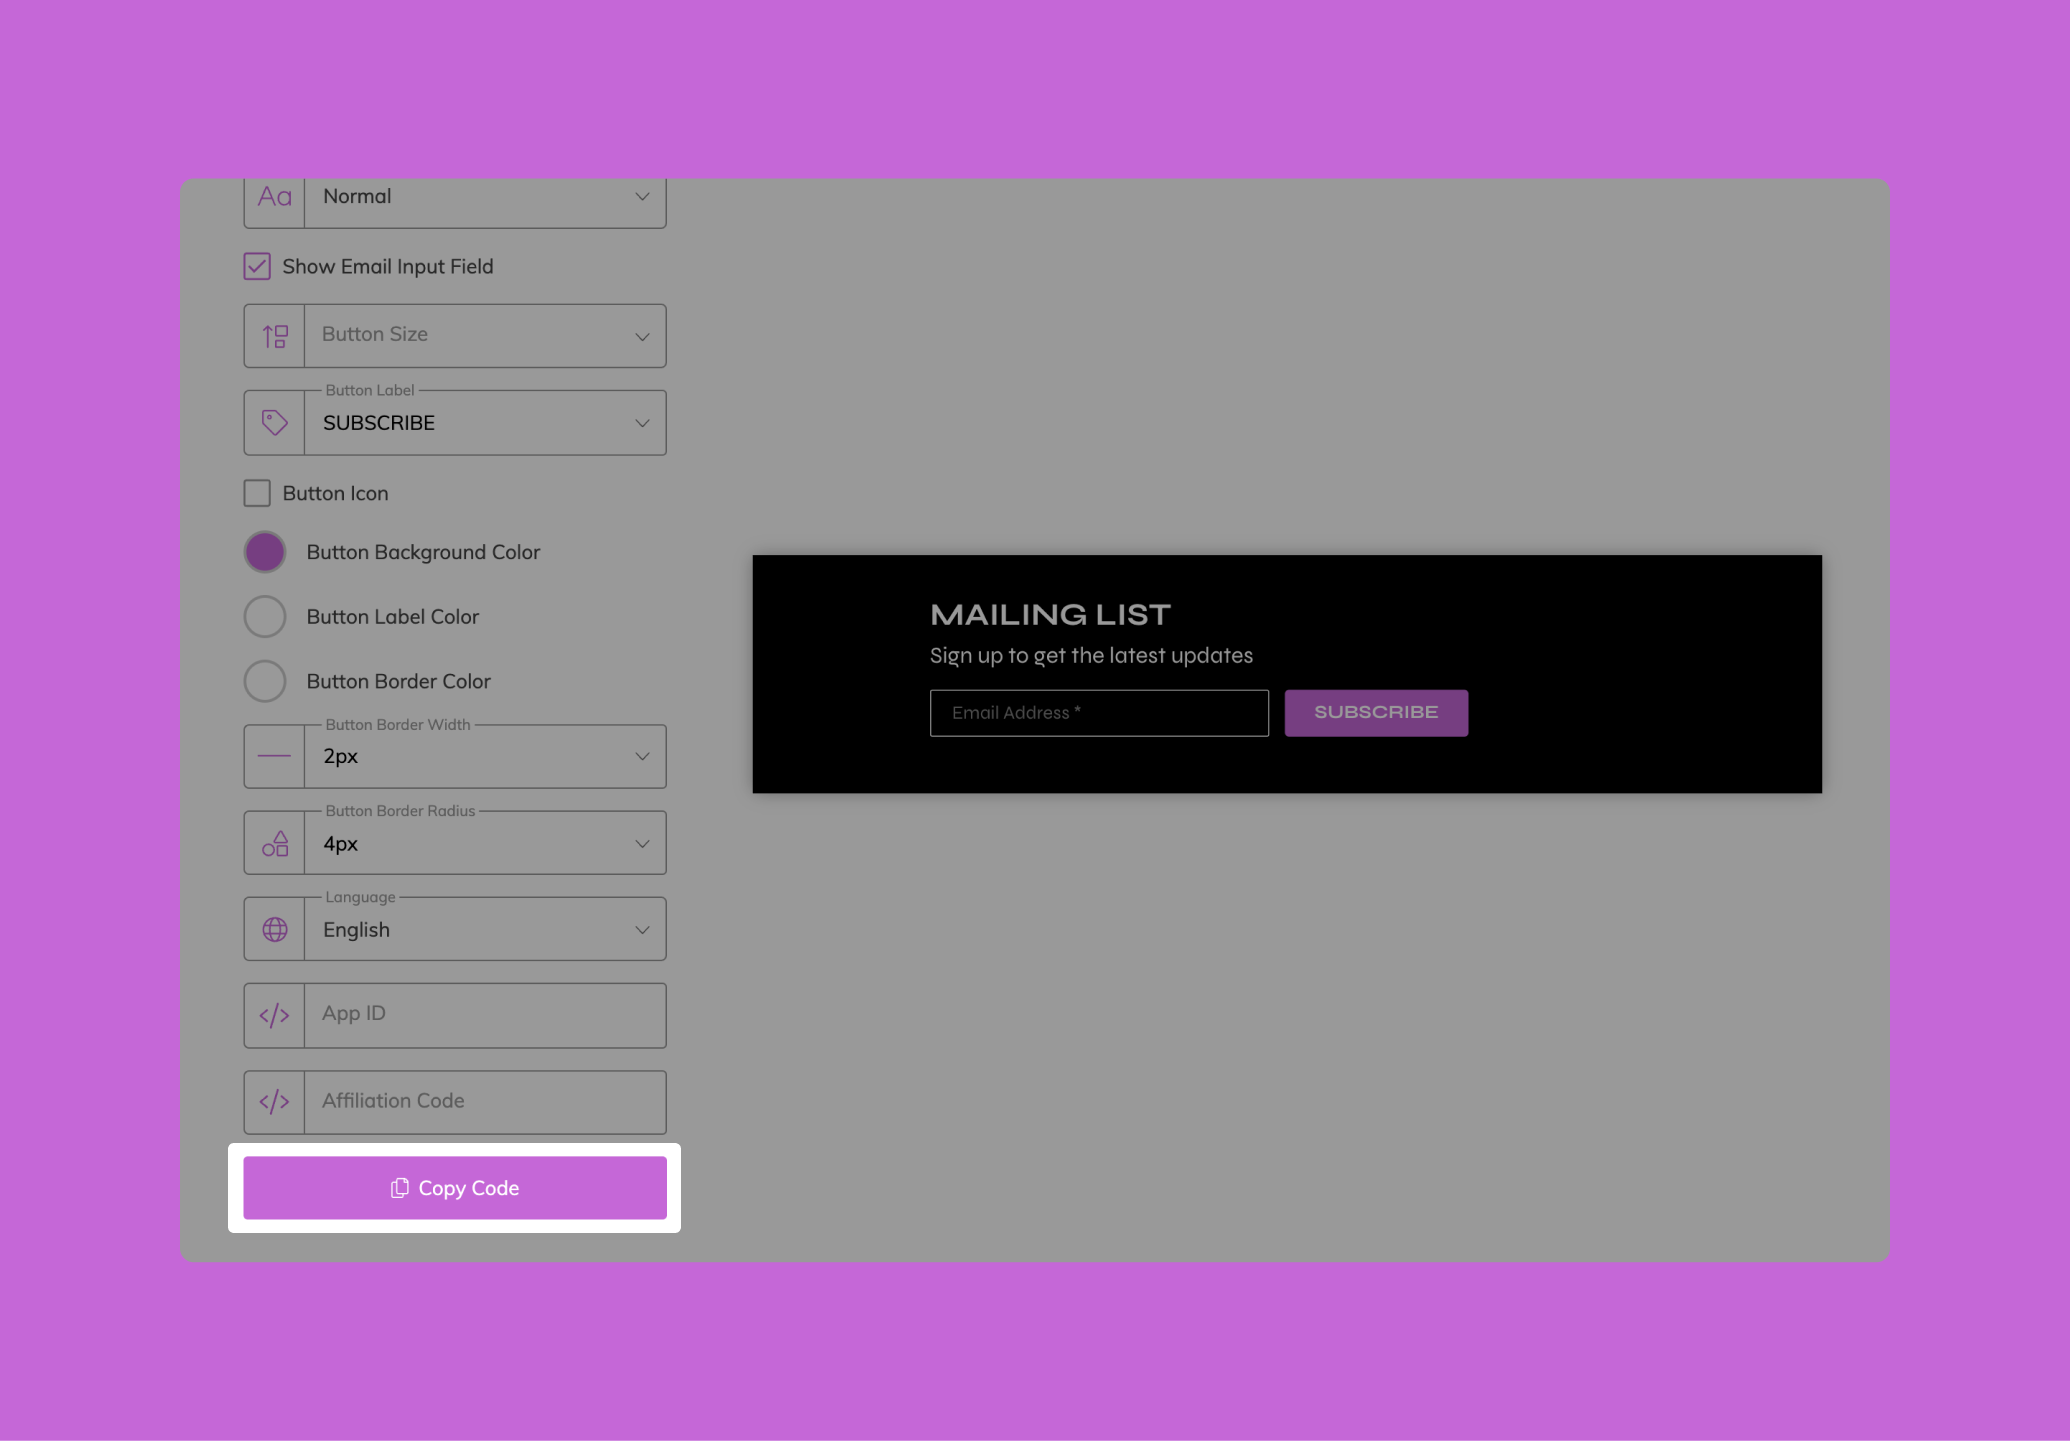
Use our builder to customize your email signup form
Copy your embed code
Add it on your wbsite
Get set up easily in just a few clicks—no coding required. Customize your form's layout, colors, fonts, and copy to match your aesthetic and voice.

Once you’ve finished customizing your Signup Form, click on the ‘Copy Code’ button, paste it on your website, and you’re all set! Your visitors can now easily subscribe to your Emails/SMS lists, follow you on Bandsintown, and begin receiving your event alerts & direct messages.
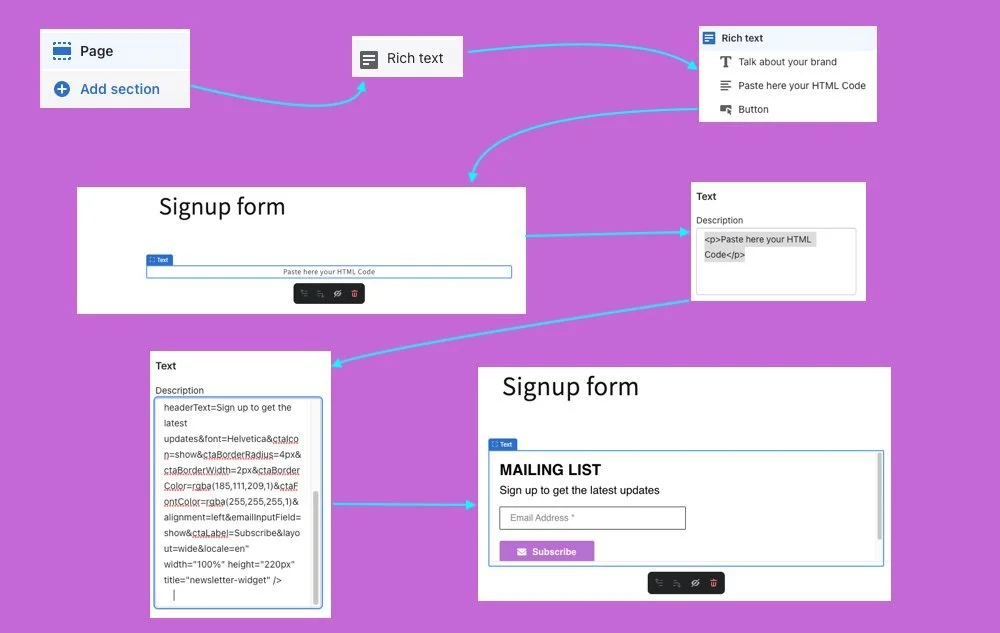
In your Shopify account, go to your Web Site
Select the page where you want to display your Signup Form (or create a new one)
Click on the Page + Add section
Select the same Rich Text you Create on the Advanced Widget Section ( section: “raw-html.liquid”)
Select the Block “Paste Here your HTML Code“
Go to “Text - Description” and Paste your Bandsintown Signup Form code
Click on Save to keep your changes
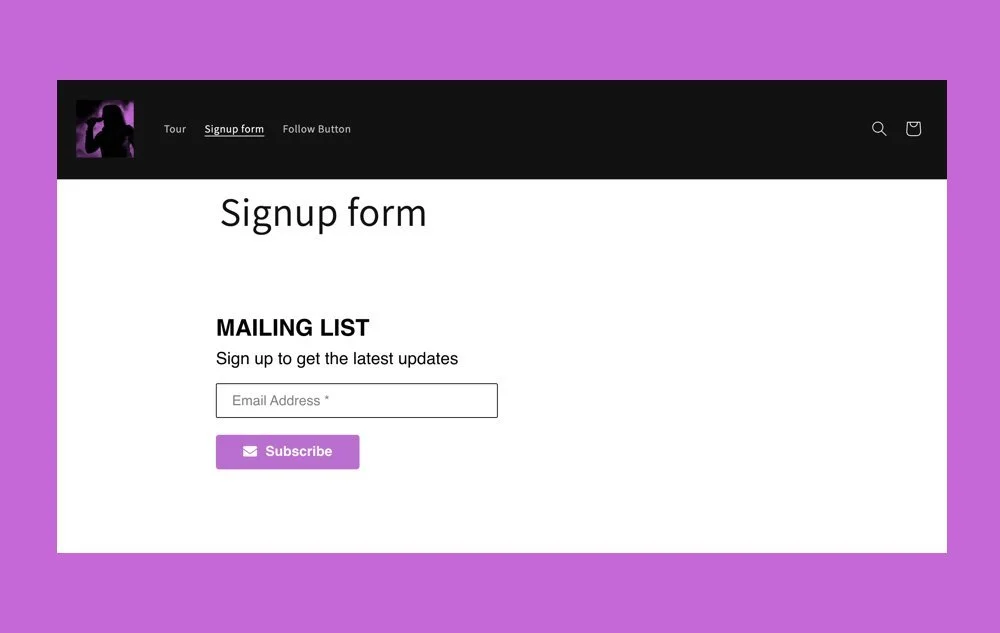
Your Mailing list form and subscribe button are now listed on your website and will sync in real-time with your Bandsintown account